Mostrando las entradas con la etiqueta Troubleshooting. Mostrar todas las entradas

martes, 5 de septiembre de 2023

Instalación de modulo PoE ISR-1100-POE4 en Router Cisco series 1100


El documento detalla la habilitación del servicio PoE (Power over Ethernet) en equipo Router Cisco C1111-4PWA, permitiendo la alimentación a través de cables Ethernet a los dispositivos de red (teléfonos IP, Access Point o cámaras IP) por medio de la conexión de datos existente.

La alimentación de energía eléctrica a través de Ethernet (PoE) es una función de red definida en los estándares IEEE 802.3af y 802.3at.

La implementación de PoE para este dispositivo permite la habilitación de una puerta PoE+ (802.3at f) o 2 puertas con protocolo PoE (802.3af).

Para hacer posible la conexión de dispositivos PoE en los Router Cisco de la serie Cisco1100 es necesario contar con los siguientes equipos adicionales:


Modulo PoE:    ISR-1100-POE4

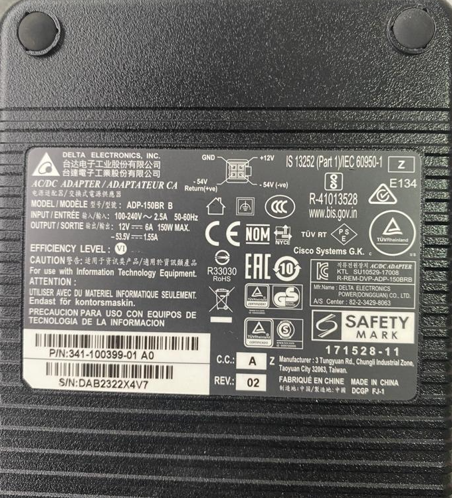
Fuente de Poder:  PWR-150W-AC


Imagen Modulo PoE:    ISR-1100-POE4


Imagen Fuente de Poder:  PWR-150W-AC


A continuación, se detalla el proceso de instalación de la tarjeta ISR-1100-POE4, la cual debe ser insertada de manera interna al equipo Router Cisco de la serie Cisco1100, en la siguiente ubicación.


La siguiente imagen muestra el módulo inserto en el equipo Router Cisco de la serie Cisco1100.


Se valida estado del módulo recientemente instalado.


miércoles, 28 de abril de 2021

Borra archivos HPROF en Cisco CMX

Los datos perdidos en equipo Cisco CMX no son posible recuperarlos.Sin embargo, existen problemas de carga en cache de JAVA que es necesario limpiar a traves de los archivos HPROF, los cuales pueden estar causando esta perdidas de datos.

Detalle tecnico de la revision:

CMX HPROF Files
=======================================================================================

/opt/cmx/var/log/nmsplb/java_pid29221.hprof
/opt/cmx/var/log/nmsplb/java_pid6280.hprof
/opt/cmx/var/log/nmsplb/java_pid6881.hprof
/opt/cmx/var/log/nmsplb/java_pid19612.hprof
/opt/cmx/var/log/presence/java_pid32466.hprof

Comandos utilizados:

[cmxadmin@CMX ~]$ su -
Password: 123456
[root@CMX ~]#
[root@CMX ~]# cd /opt/cmx/var/log/nmsplb/
[root@CMX nmsplb]# ll
total 24879068
-rw-r--r--. 1 cmx cmx          0 Oct 28  2019 batch.log
-rw-r--r--. 1 cmx cmx   52436971 Apr  9 19:20 error-1.log
-rw-r--r--. 1 cmx cmx          0 Oct 28  2019 heterarchy.log
-rw-------. 1 cmx cmx 4947842167 Dec 29 16:35 java_pid19612.hprof
-rw-------. 1 cmx cmx 4413003406 Mar 31 21:30 java_pid2779.hprof
-rw-------. 1 cmx cmx 5144773801 Dec 19 10:03 java_pid29221.hprof
-rw-------. 1 cmx cmx 4954666834 Jan  4 16:02 java_pid6280.hprof
-rw-------. 1 cmx cmx 4935861279 Dec 30 19:18 java_pid6881.hprof
-rw-r--r--. 1 cmx cmx    1785585 Apr 24 23:44 jdbc.log
-rw-r--r--. 1 cmx cmx          0 Oct 28  2019 sanity.log
-rw-r--r--. 1 cmx cmx   52428866 Sep  3  2020 server-10.log
-rw-r--r--. 1 cmx cmx   52428892 Mar 18 22:35 server-1.log

[root@CMX nmsplb]#
[root@CMX nmsplb]#
[root@CMX nmsplb]#
[root@CMX nmsplb]# rm -rf java_pid19612.hprof
[root@CMX nmsplb]# rm -rf java_pid2779.hprof
[root@CMX nmsplb]# rm -rf java_pid29221.hprof
[root@CMX nmsplb]# rm -rf java_pid6280.hprof
[root@CMX nmsplb]# rm -rf java_pid6881.hprof
[root@CMX nmsplb]#
[root@CMX nmsplb]#
[root@CMX nmsplb]# ll
total 1054692
-rw-r--r--. 1 cmx cmx          0 Oct 28  2019 batch.log
-rw-r--r--. 1 cmx cmx   52436971 Apr  9 19:20 error-1.log
-rw-r--r--. 1 cmx cmx          0 Oct 28  2019 heterarchy.log
-rw-r--r--. 1 cmx cmx    1785585 Apr 24 23:44 jdbc.log
-rw-r--r--. 1 cmx cmx          0 Oct 28  2019 sanity.log
-rw-r--r--. 1 cmx cmx   52428866 Sep  3  2020 server-10.log
-rw-r--r--. 1 cmx cmx   52428892 Mar 18 22:35 server-1.log
[root@CMX nmsplb]#


Cargar IOS Cisco a traves de FTP utilizando VRF

Cuando copiamos la IOS de un router utilizando VRF, debemos utilizar la interface fuente correspondiente a la VRF a utilizar, ademas el nombre y la password debe ser especificada.

Ejemplo en un equipo Cisco9500


C9500#show run interf vlan 9

!
interface Vlan9
 description Red Internet
 ip vrf forwarding Internet
 ip address 2.2.2.2 255.255.255.240
end


C9500#configure terminal
C9500(config)#ip ftp source-interface Vlan9
C9500(config)#ip ftp username Gfuentes
C9500(config)#ip ftp password C1sC0$

C9500#
C9500#copy ftp: flash:
Address or name of remote host []? 1.1.1.1    /* IP ADD del servidor FTP /*
Source filename []? cat9k_iosxe.17.03.03.SPA.bin
Destination filename [cat9k_iosxe.17.03.03.SPA.bin]?
Accessing ftp://200.68.6.62/cat9k_iosxe.17.03.03.SPA.bin...
Loading cat9k_iosxe.17.03.03.SPA.bin !!!!!!!!!!!!!!!!!!!!!!!!!!!!!!!!!!!!!!!!!!!!!!!!!!!!!!!!!!!!!!!!!!!!!!!!!!!!!!!!!!!!!!!!!!!!!!!!!!!!!!!!!!!!!!!!!!!!!!!!!!!!!!!!!!!!!!!!!!!!!!!!!!!!!!!!!!!!!!!!!!!!!!!!!!!!!!!!!!!!!!!!!!!!!!!!!!!!!!!!!!!!!!!!!!!!!!!!!!!!!!!!!!!!!!!!!!!!!!!!!!!!!!!!!!!!!!!!!!!!!!!!!!!!!!!!!!!!!!!!!!!!!!!!!!!!!!!!!!!!!!!!!!!!!!!!!!!!!!!!!!!!!!!!!!!!!!!!!!!!!!!!!!!!!!!!!!!!!!!!!!!!!!!!!!!!!!!!!!!!!!!!!!!!!!!!!!!!!!!!!!!!!!!!!!!!!!!!!!!!!!!!!!!!!!!!!!!
[OK - 901741775/4096 bytes]

901741775 bytes copied in 654.829 secs (1377065 bytes/sec)
C9500#

Validar la correcta instalacion de la nueva IOS

C9500#verify flash:cat9k_iosxe.17.03.03.SPA.bin
Verifying file integrity of flash:cat9k_iosxe.17.03.03.SPA.bin...........................................................................................................................................................................................................................................................................................................................................................................
Embedded Hash   SHA1 : 86144E8D88FE3DC09924989F6D54614CD760F70A
Computed Hash   SHA1 : 86144E8D88FE3DC09924989F6D54614CD760F70A
Starting image verification
Hash Computation:    100%Done!
Computed Hash   SHA2: d86bccd824544cac29ae634be6e4d394
                      a05a0d9cdd7d9d0b569cfa4083a5394d
                      3ceca89a6562b2f4c91814066314b0f3
                      d96f36e07c44ab35433e7a8286f61d69

Embedded Hash   SHA2: d86bccd824544cac29ae634be6e4d394
                      a05a0d9cdd7d9d0b569cfa4083a5394d
                      3ceca89a6562b2f4c91814066314b0f3
                      d96f36e07c44ab35433e7a8286f61d69

Digital signature successfully verified in file flash:cat9k_iosxe.17.03.03.SPA.bin
 

lunes, 26 de abril de 2021

Huawei - Local VLAN Mirroring - Switch CE6851

 1.- Configuracion de puerta donde se conectara el Sniffer.

<SW6851> system-view
[SW6851] observe-port 1 interface 10ge 1/0/2
[SW6851] commit


2.- Configuracion de VLAN a configurar

<SW6851>system-view
[SW6851]vlan 100
[SW6851-vlan100]mirroring observe-port 1 inbound
[SW6851-vlan100]commit


<SW6851> display port-mirroring
  VLAN mirroring:
  -----------------------------------------------------------------------------
  VLAN                  Direction        ObservePort : Interface
  -----------------------------------------------------------------------------
  VLAN 100             Inbound                    1 : 10GE1/0/2          
  -----------------------------------------------------------------------------


NOTA: Este modelo no soporta las opciones <<outbound>> ni <<both>>


lunes, 19 de abril de 2021

Configuracion de Switches 3750-X en modo Stack

Al iniciar la configuracion de Switches 3750-X en modo Stack, no conecte ningun cable stacking todavia, decida cual switch sera el "Master" a traves de los siguientes comandos:

Switch#configure terminal
Enter configuration commands, one per line.  End with CNTL/Z.
Switch(config)#switch 1 priority 15
Changing the Switch Priority of Switch Number 1 to 15
Do you want to continue?[confirm] {Enter}
New Priority has been set successfully

Switch(config)#do write mem
Building configuration...
[OK]

Switch(config)#do reload
Proceed with reload? [confirm] {Enter}

Cuando se este iniciando el switch y vea el siguiente mensaje:

Waiting for Stack Master Election...
SM: Waiting for other switches in stack to boot...
###############################################################

En este punto puede conectar el cable stack y encender el siguiente switch. Cada puerta "stack port one" debe conectarse a la puerta "stack port two".

Despues que los dos switches se encuentren encedidos se debe verificar lo siguiente:

Switch#show switch
Switch/Stack Mac Address : 74a2.e69a.0c00
                                           H/W   Current
Switch#  Role   Mac Address     Priority Version  State
----------------------------------------------------------
*1       Master 74a2.e69a.0c00     15     3       Ready
 2       Member 204c.9e5f.4000     1      3       Ready

Switch#show ip int brief
Interface              IP-Address      OK? Method Status                Protocol
Vlan1                  unassigned      YES NVRAM  administratively down down
FastEthernet0          unassigned      YES NVRAM  administratively down down
GigabitEthernet1/0/1   unassigned      YES unset  down                  down
GigabitEthernet1/0/2   unassigned      YES unset  down                  down
GigabitEthernet1/0/3   unassigned      YES unset  down                  down
GigabitEthernet1/0/4   unassigned      YES unset  down                  down
{----------------Output Removed For the Sake of Brevity---------------------}
GigabitEthernet1/1/1   unassigned      YES unset  down                  down
GigabitEthernet1/1/2   unassigned      YES unset  down                  down
GigabitEthernet1/1/3   unassigned      YES unset  down                  down
GigabitEthernet1/1/4   unassigned      YES unset  down                  down
Te1/1/1                unassigned      YES unset  down                  down
Te1/1/2                unassigned      YES unset  down                  down
GigabitEthernet2/0/1   unassigned      YES unset  down                  down
GigabitEthernet2/0/2   unassigned      YES unset  down                  down
GigabitEthernet2/0/3   unassigned      YES unset  down                  down
{----------------Output Removed For the Sake of Brevity---------------------}
GigabitEthernet2/1/1   unassigned      YES unset  down                  down
GigabitEthernet2/1/2   unassigned      YES unset  down                  down
GigabitEthernet2/1/3   unassigned      YES unset  down                  down
GigabitEthernet2/1/4   unassigned      YES unset  down                  down
Te2/1/1                unassigned      YES unset  down                  down
Te2/1/2                unassigned      YES unset  down                  down

Asegurese que el cableado stack se encuentra funcionando normalmente.

Switch# show switch stack-ports summary
Switch#/  Stack   Neighbor   Cable    Link   Link   Sync      #         In
 Port#     Port              Length    OK   Active   OK    Changes   Loopback
          Status                                          To LinkOK
--------  ------  --------  --------  ----  ------  ----  ---------  --------
  1/1     OK         2      50 cm     Yes    Yes    Yes        1        No
  1/2     OK         2      50 cm     Yes    Yes    Yes        1        No
  2/1     OK         1      50 cm     Yes    Yes    Yes        1        No
  2/2     OK         1      50 cm     Yes    Yes    Yes        1        No

Switch# show switch stack-ring speed
Stack Ring Speed        : 32G
Stack Ring Configuration: Full
Stack Ring Protocol     : StackWisePlus
Switch#

Validar la conectividad de las fuentes de poder de los switches.

Switch>show env power all
SW  PID                 Serial#     Status           Sys Pwr  PoE Pwr  Watts
---  ------------------  ----------  ---------------  -------  -------  -----
1A  C3KX-PWR-350WAC     LIT18410MD4 OK              Good     Good     350/0
1B  Not Present
2A  C3KX-PWR-350WAC     LIT18410JJ3 OK              Good     Good     350/0
2B  Not Present
En el caso de utilizar cables de poder redundantes XPS;

Switch#show stack-power neighbors
Power Stack           Stack   Stack    Total   Rsvd    Alloc   Unused  Num  Num
Name                  Mode    Topolgy  Pwr(W)  Pwr(W)  Pwr(W)  Pwr(W)  SW   PS
--------------------  ------  -------  ------  ------  ------  ------  ---  ---
Powerstack-2          SP-PSS  Ring     700     320     380     0       2    2
    Power Stack           Port 1  Port 1             Port 2  Port 2
SW  Name                  Status  Neighbor SW:MAC    Status  Neighbor SW:MAC
--  --------------------  ------  ----------------   ------  ----------------
1   Powerstack-2          Conn    2:204c.9e5f.4000   Conn    2:204c.9e5f.4000
2   Powerstack-2          Conn    1:74a2.e69a.0c00   Conn    1:74a2.e69a.0c00

miércoles, 21 de octubre de 2020

Juniper SRX – Commit error: Missing mandatory statement

Despues de cambiar la configuracion inicial en un dispositivo Juniper SRX, es posible que al momento de guardar la configuracion aparezca el siguiente error.

root# commit
[edit]
  'system'
    Missing mandatory statement: 'root-authentication'
error: commit failed: (missing mandatory statements)

Este error se debe a que no se ha configurado el "root password". Este debe ser configurado antes de guardar los cambios en el equipo a traves del siguiente comando.

root# set system root-authentication plain-text-password
New password: juniper1
Retype new password:juniper1
root# commit

jueves, 20 de diciembre de 2018

Borrar configuración de AP en modo LWAAP

Este procedimiento, es necesario realizarlo al momento de existir problemas de asociación entre el AP y el WLC.

Se puede borrar la configuración correspondiente a los AP en modo LWAAP a través del comando "clear", pero no esta disponible por defecto.

AP5c83.8f3b.fdac>ena
Password:
AP5c83.8f3b.fdac# clear capwap private-config
                     ^
% Invalid input detected at '^' marker.

Para permitir este comando es necesario habilitar el modo debug, a través del siguiente comando.

AP5c83.8f3b.fdac#debug capwap console cli
This command is meant only for debugging/troubleshooting
Any configuration change may result in different
behavior from centralized configuration.

Paso 1.- Borrar la configuración previamente almacenada en el AP.

CAPWAP console CLI allow/disallow debugging is on
AP5c83.8f3b.fdac# clear capwap private-config


Paso 2.- Reiniciar el AP

AP5c83.8f3b.fdac#reload
System configuration has been modified. Save? [yes/no]: yes
Proceed with reload? [confirm]

Despues del reinicio, este AP podira unirse sin problemas al Controlador.

martes, 18 de diciembre de 2018

Upgrade Manual de lightweight Access Point

Se puede realizar la actualización de firmware de Access Point (AP) en forma manual. Para esto es necesario descargar el firmware desde Cisco.com.

Una vez descargado el archivo, este debe ser almacenado en un servidor TFTP que debe ser alcanzado desde el AP.

Para descargar, extraer e instalar el nuevo firmware es necesario utilizar el comando "archive", pero este no esta disponible por defecto.

AP5c83.8f3b.fdac#arch?
% Unrecognized command

Para permitir este comando es necesario habilitar el modo debug.

AP5c83.8f3b.fdac#debug capwap console cli
This command is meant only for debugging/troubleshooting
Any configuration change may result in different
behavior from centralized configuration.

CAPWAP console CLI allow/disallow debugging is on

En estos momentos es posible seguri con el procedimiendo de actualizacion de firmware, debido que es posible contar con el comando "archive"

Paso 1.-  Revision de IOS instalada en AP

AP5c83.8f3b.fdac#show flash: 

Directory of flash:/

    2  -rwx        1048  Mar 04 2002 17:42:43 +00:00  private-multiple-fs
    4  -rwx         209  Mar 01 2002 00:00:08 +00:00  env_vars
    5  -rwx        3318  Mar 04 2002 17:42:43 +00:00  config.txt
    6  drwx         512  Jan 31 2009 04:53:24 +00:00  c1200-k9w7-mx.123-8.JEB
  158  -rwx           5  Mar 04 2002 17:42:43 +00:00  private-config

7741440 bytes total (2740736 bytes free)


Paso 2.-  Respaldar IOS Actual

AP5c83.8f3b.fdac#cd c1200-k9w7-mx.123-8.JEB

AP5c83.8f3b.fdac#pwd
flash:/c1200-k9w7-mx.123-8.JEB/

AP5c83.8f3b.fdac#copy flash: tftp:         
Source filename [/c1200-k9w7-mx.123-8.JEB/c1200-k9w7-mx.123-8.JEB]? 
Address or name of remote host []? 10.3.64.5                 
Destination filename [c1200-k9w7-mx.123-8.JEB]? 
!!!!!!!!!!!!!!!!!!!!!!!!!!!!!!!!!!!!!!!!!!!!!!!!!!!!!!!!!!!!!!!!!!!!!!!!!!!!!!!!!!!!!!!!!!!!!!!!!!!!!!!!!!!!!!!!!!!!!!!!!!!!!
!!!!!!!!!!!!!!!!!!!!!!!!!!!!!!!!!!!!!!!!!!!!!!!!!!!!!!!!!!!!!!!!!!!!!!!!!!!!!!!!!!!!!!!!!!!!!!!!!!!!!!!!!!!!!!!!!!!!!!!!!!!!!
!!!!!!!!!!!!!!!!!!!!!!!!!!!!!!!!!!!!!!!!!!!!!!!!!!!!!!!!!!!!!!!!!!!!!!!!!!!!!!!!!!!!!!!!!!!!!!!!!!!!!!!!!!!!!!!!!!!!!!!!!!!!!
!!!!!!!!!!!!!!!!!!!!!!!!!!!!!!!!!!!!!!!!!!!!!!!!!!!!!!!!!!!!!!!!!!!!!!!!!!!!!!!!!!!!!!!!!!!!!!!!!!!!!!!!!!!!!!!!!!!!!!!!!!!!!
!!!!!!!!!!!!!!!!!!!!!!!!!!!!!!!!!!!!!!!!!!!!!!!!!!!!!!!!!!!!!!!!!!!!!!!!!!!!!!!!!!!!!!!!!!!!!!!!!!!!!!!!!!!!!!!!!!!!!!!!!!!!!
!!!!!!!!!!!!!!!!!!!!!!!!!!!!!!!!!!!!!!!!!!!!!!!!!!!!!!!!!!!!!!!!!!!!!!!!!!!!!!!!!!!!!!!!!!!!!
3668650 bytes copied in 9.726 secs (377200 bytes/sec)


Paso 3.- Borrar IOS Actual

AP5c83.8f3b.fdac#delete /force /recursive flash:/c1200-k9w7-mx.123-8.JEB
Delete filename [c1200-k9w7-mx.123-8.JEB]? 

AP5c83.8f3b.fdac#dir
Directory of flash:/

    2  -rwx        1048  Mar 04 2002 17:42:43 +00:00  private-multiple-fs
    4  -rwx         209  Mar 01 2002 00:00:08 +00:00  env_vars
    5  -rwx        3318  Mar 04 2002 17:42:43 +00:00  config.txt
  158  -rwx           5  Mar 04 2002 17:42:43 +00:00  private-config

7741440 bytes total (7734272 bytes free)


Paso 4.- Upgrade IOS 

AP5c83.8f3b.fdac#archive download-sw tftp://10.3.64.5/c1200-k9w7-tar.123-8.JEE.tar
examining image...Loading c1200-k9w7-tar.123-8.JEE.tar from 172.16.4.61 (via BVI1): !
extracting info (274 bytes)
!!!!!!!!!!!!!!!!!!!!!!!!!!!!!!!!!!!!!!!!!!!!!!!!!!!!!!!!!!!!!!!!!!!!!!!!!!!!!!!!!!!!!!!!!!!!!!!!!!!!!!!!!!!!!!!!!!!!!!!
!!!!!!!!!!!!!!!!!!!!!!!!!!!!!!!!!!!!!!!!!!!!!!!!!!!!!!!!!!!!!!!!!!!

this completes ok.

[OK - 4522496 bytes]


jueves, 8 de noviembre de 2018

Procedimiento de carga de licencia a Router Cisco


Paso 1: Copiar la licencia a través de FTP o TFTP a la memoria FLASH del router.

Router#copy ftp: flash:
Address or name of remote host []? 172.30.79.198
Source filename []? FTX181324AB_20199918063213280.lic
Destination filename [FTX181324AB_20199918063213280.lic]?
Accessing ftp://172.30.79.198/FTX181324AB_20199918063213280.lic...
Loading FTX181324AB_20199918063213280.lic !
[OK - 1155/4096 bytes]

1155 bytes copied in 5.948 secs (194 bytes/sec)


Paso 2: Verificar que se encuentre instalada la licencia en el dispositivo.

Router#show flash
-#- --length-- -----date/time------ path
1     68951124 Apr 19 2014 00:40:58 +00:00 c1900-universalk9-mz.SPA.152-4.M6.bin
2         3064 Apr 19 2014 00:50:12 +00:00 cpconfig-19xx.cfg
3          660 Dec 12 2015 13:19:20 +00:00 vlan.dat
247       1155 Dec 21 2015 18:08:36 +00:00 FTX181324AB_20199918063213280.lic

Paso 3: Instalar la licencia al equipo router, en este punto la licencia se encuentra instalada pero no habilitada.

Router#license install flash:FTX181324AB_20199918063213280.lic

Installing licenses from "flash:FTX181324AB_20199918063213280.lic"
Installing...Feature:securityk9...Successful:Supported
1/1 licenses were successfully installed
0/1 licenses were existing licenses
0/1 licenses were failed to install

Paso 4: Reiniciar el equipo y verificar que se encuentre habilitada la licencia.

Router#show license
Index 1 Feature: ipbasek9
        Period left: Life time
        License Type: Permanent
        License State: Active, In Use
        License Count: Non-Counted
        License Priority: Medium
Index 2 Feature: securityk9
        Period left: Life time
        License Type: Permanent
        License State: Active, In Use
        License Count: Non-Counted
        License Priority: Medium


Nota: Anteriormente se encontraba en el siguiente estado;


Router#show license
Index 1 Feature: ipbasek9
        Period left: Life time
        License Type: Permanent
        License State: Active, In Use
        License Count: Non-Counted
        License Priority: Medium
Index 2 Feature: securityk9
        Period left: 7  weeks 2  days
        Period Used: 1  week  1  day
        License Type: EvalRightToUse
        License State: Active, In Use
        License Count: Non-Counted
        License Priority: Low

miércoles, 7 de noviembre de 2018

Configuración de ALIAS


El siguiente comando nos permite configurar un ALIAS para ayudarnos a ingresar comandos en forma resumida y con un nombre en particular dado por nosotros.


Router(config)# alias exec sip show ip route
Router# sip

Codes: L - local, C - connected, S - static, R - RIP, M - mobile, B - BGP
       D - EIGRP, EX - EIGRP external, O - OSPF, IA - OSPF inter area
       N1 - OSPF NSSA external type 1, N2 - OSPF NSSA external type 2
       E1 - OSPF external type 1, E2 - OSPF external type 2

Gateway of last resort is 10.184.124.4 to network 0.0.0.0

S*    0.0.0.0/0 [1/0] via 10.184.124.4
      10.0.0.0/8 is variably subnetted, 172 subnets, 7 masks
S        10.0.1.55/32 [1/0] via 10.184.0.41

  
Si utilizamos el comando alias configure, el comando deberá ser ejecutado en el modo de configuración.

Router(config)#alias configure sip1 do show ip route
Router(config)# sip1


Codes: L - local, C - connected, S - static, R - RIP, M - mobile, B - BGP
       D - EIGRP, EX - EIGRP external, O - OSPF, IA - OSPF inter area
       N1 - OSPF NSSA external type 1, N2 - OSPF NSSA external type 2
       E1 - OSPF external type 1, E2 - OSPF external type 2
       i - IS-IS, su - IS-IS summary, L1 - IS-IS level-1, L2 - IS-IS level-2
       ia - IS-IS inter area, * - candidate default, U - per-user static route
       o - ODR, P - periodic downloaded static route, + - replicated route

Gateway of last resort is 10.184.124.4 to network 0.0.0.0

S*    0.0.0.0/0 [1/0] via 10.184.124.4
      10.0.0.0/8 is variably subnetted, 172 subnets, 7 masks
S        10.0.1.55/32 [1/0] via 10.184.0.41

jueves, 25 de octubre de 2018

Método para forzar la utilización de SFP Transceiver no propietarios en dispositivos Cisco.

De acuerdo a pruebas realizadas en equipo Router Cisco C899G-LTE-LA-K9 con módulos de fibra (SFP) no propietarios, se efectuaron pruebas con el siguiente módulo SFP Raisecom USFP-Gb/SS134-D-R 1.26G. 

En una primera instancia sin ningún tipo  de configuración en el equipo este módulo no es reconocido directamente;

*Apr 26 12:19:58.007: %GBIC_SECURITY_CRYPT-4-VN_DATA_CRC_ERROR: GBIC in port 1 has bad crc
*Apr 26 12:19:58.007: %MAINBOARD_SFP-6-INSERTED: Transceiver module unapproved SFP is inserted in GigabitEthernet8 port.
*Apr 26 12:19:58.007: %MAINBOARD_SFP-4-NON_CISCO_SFP: Unsupported SFP transceiver module found on board.

Por lo tanto, para que pueda ser aceptado se requiere habilitar el siguiente comando el equipo Cisco.

Router(config)#service unsupported-transceiver 
 Warning: When Cisco determines that a fault or defect can be traced to
the use of third-party transceivers installed by a customer or reseller,
then, at Cisco's discretion, Cisco may withhold support under warranty or
a Cisco support program. In the course of providing support for a Cisco
networking product Cisco may require that the end user install Cisco
transceivers if Cisco determines that removing third-party parts will
assist Cisco in diagnosing the cause of a support issue.

*Apr 26 12:23:16.007: %GBIC_SECURITY_CRYPT-4-VN_DATA_CRC_ERROR: GBIC in port 1 has bad crc
*Apr 26 12:23:16.007: %MAINBOARD_SFP-6-INSERTED: Transceiver module unknown SFP is inserted in GigabitEthernet8 port.


martes, 8 de mayo de 2018

Troubleshooting - Instalación de modulo C3KX-SM-10G

Para la instalación del módulo C3KX-SM-10G en Switch Cisco WS-C3560X-24 fue necesario la actualización del sistema operativo del dispositivo debido a que el mínimo release soportado corresponde al 15.0(1)SE. 

Switch#show version | include image

System image file is "flash:/c3560e-universalk9-mz.122-55.SE12.bin"

Instalacion de nueva IOS

Switch#dir usbflash0:
Directory of usbflash0:/

    1  -rw-     2489592  Dec 26 2014 16:14:14 +00:00  NetacEncryptionKey.exe
    2  -rw-    26945536   May 8 2018 11:14:40 +00:00  c3560e-universalk9-mz.152-4.E6.bin

Switch#copy usbflash0:c3560e-universalk9-mz.152-4.E6.bin flash:
Destination filename [c3560e-universalk9-mz.152-4.E6.bin]? 
Copy in Progress...CCCCCCCCCCCCCCCCCCCCCCCCCCCCCCCCCCCCCCCCCCCCCCCCCCCCCCCCCCCCCCCCCCCCCCCCCCCCC
26945536 bytes copied in 50.212 secs

Switch#dir flash:
Directory of flash:/

    2  -rwx    26945536   Mar 1 1993 00:31:03 +00:00  c3560e-universalk9-mz.152-4.E6.bin
    3  -rwx    14569322   Mar 1 1993 00:06:29 +00:00  c3560e-universalk9-mz.122-55.SE12.bin
    4  -rwx        1932   Jan 2 2006 00:02:04 +00:00  config.text
    5  -rwx        1917   Jan 2 2006 00:02:04 +00:00  private-config.text
    6  -rwx        3096   Jan 2 2006 00:02:04 +00:00  multiple-fs

Switch(config)#boot system flash:c3560e-universalk9-mz.152-4.E6.bin


Una vez reiniciado el equipo, se presenta incompatibilidad de versión de software del módulo con la versión de IOS del switch.

*Jan  2 00:04:37.293: %PLATFORM_SM10G-3-SW_VERSION_MISMATCH: The FRULink 10G Service Module (C3KX-SM-10G) in switch 1 has a 

software version that is incompatible with the IOS software version. Please update the software. Module is in pass-thru mode.


Switch#show inventory
NAME: "1", DESCR: "WS-C3560X-24"
PID: WS-C3560X-24T-S   , VID: V02  , SN: FDO15123456

NAME: "Power Supply 2", DESCR: "FRU Power Supply"
PID: C3KX-PWR-350WAC   , VID: V02L , SN: LIT15123456

NAME: "FRULink Slot 1 - FRULink Module", DESCR: "FRULink 10G SM Module"
PID: C3KX-SM-10G       , VID: V02  , SN: FDO18123456

NAME: "TenGigabitEthernet1/1", DESCR: "SFP-10GBase-SR"
PID: SFP-10G-SR          , VID: V03  , SN: AVD20123456     

NAME: "TenGigabitEthernet1/2", DESCR: "SFP-10GBase-SR"
PID: SFP-10G-SR          , VID: V03  , SN: FNS20123456     


Switch#sh switch service-modules
Switch/Stack supports service module CPU version: 03.08.06.WAL
                          Temperature                     CPU
Switch#  H/W Status       (CPU/FPGA)      CPU Link      Version
-----------------------------------------------------------------
 1       OK               60C/68C         ver-mismatch  03.00.41 


Debido a esta incompatibilidad fue necesario la actualización del software del módulo, para que finalmente sea reconocido sin problemas.

Switch#archive download-sw /overwrite /reload usbflash0:c3kx-sm10g-tar.152-4.E6.tar    
examining image...
extracting info (99 bytes)
extracting c3kx-sm10g-mz.152-4.E6/info (500 bytes)
extracting info (99 bytes)

System Type:             0x00010002
  Ios Image File Size:   0x017BDA00
  Total Image File Size: 0x017BDA00
  Minimum Dram required: 0x08000000
  Image Suffix:          sm10g-152-4.E6
  Image Directory:       c3kx-sm10g-mz.152-4.E6
  Image Name:            c3kx-sm10g-mz.152-4.E6.bin
  Image Feature:         IP|LAYER_3|MIN_DRAM_MEG=128
  FRU Module Version:    03.08.06.WAL


Updating FRU Module on switch 1...
!!!!!!!!!!!!!!!!!!!!!!!!!!!!!!!!!!!!!!!!!!!!!!!!!!!!!!!!!!!!!!!!!!!!!!!!!!!!!!!!!!!!!!!!!!!!!!!!!!!
Updating FRU FPGA image...

FPGA image update complete.

All software images installed.
Requested system reload in progress...

(reinicio de equipo)

*Jan  2 00:02:28.016: %PLATFORM-6-FRULINK_INSERTED: FRULink 10G SM module inserted.
*Jan  2 00:02:28.906: %PHY-5-TRANSCEIVERINSERTED: Slot=1 Port=30: Transceiver has been inserted
*Jan  2 00:02:29.166: %PHY-5-TRANSCEIVERINSERTED: Slot=1 Port=29: Transceiver has been inserted
Switch>

Switch>
*Jan  2 00:04:45.137: %PLATFORM_SM10G-6-LINK_UP: The FRULink 10G Service Module (C3KX-SM-10G) communication has been 

established.
Switch>sh switch service-modules
Switch/Stack supports service module CPU version: 03.08.06.WAL
                          Temperature                     CPU
Switch#  H/W Status       (CPU/FPGA)      CPU Link      Version
-----------------------------------------------------------------

 1       OK               67C/70C         connected     03.08.06.

Instalación de modulo PoE ISR-1100-POE4 en Router Cisco series 1100

  El documento detalla la habilitación del servicio PoE (Power over Ethernet) en equipo Router Cisco C1111-4PWA, permitiendo la alimentación...