martes, 5 de septiembre de 2023

Instalación de modulo PoE ISR-1100-POE4 en Router Cisco series 1100


El documento detalla la habilitación del servicio PoE (Power over Ethernet) en equipo Router Cisco C1111-4PWA, permitiendo la alimentación a través de cables Ethernet a los dispositivos de red (teléfonos IP, Access Point o cámaras IP) por medio de la conexión de datos existente.

La alimentación de energía eléctrica a través de Ethernet (PoE) es una función de red definida en los estándares IEEE 802.3af y 802.3at.

La implementación de PoE para este dispositivo permite la habilitación de una puerta PoE+ (802.3at f) o 2 puertas con protocolo PoE (802.3af).

Para hacer posible la conexión de dispositivos PoE en los Router Cisco de la serie Cisco1100 es necesario contar con los siguientes equipos adicionales:


Modulo PoE:    ISR-1100-POE4

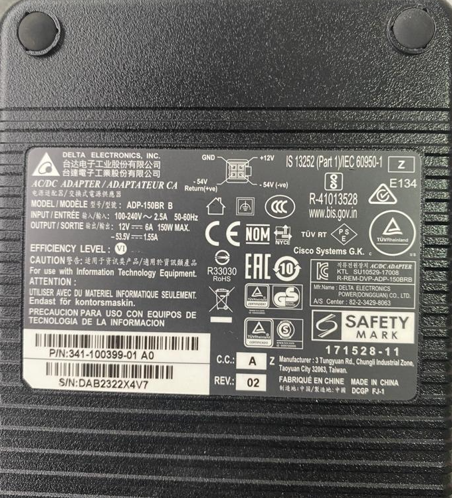
Fuente de Poder:  PWR-150W-AC


Imagen Modulo PoE:    ISR-1100-POE4


Imagen Fuente de Poder:  PWR-150W-AC


A continuación, se detalla el proceso de instalación de la tarjeta ISR-1100-POE4, la cual debe ser insertada de manera interna al equipo Router Cisco de la serie Cisco1100, en la siguiente ubicación.


La siguiente imagen muestra el módulo inserto en el equipo Router Cisco de la serie Cisco1100.


Se valida estado del módulo recientemente instalado.


jueves, 2 de septiembre de 2021

Actualizacion Software Junos SRX300 a traves de FTP

Revision de actual version de Software de Router SRX300

SRX300> show version
Hostname: SRX300
Model: srx300
Junos: 17.3R1.10
JUNOS Software Release [17.3R1.10]

Actualizacion de sistema operativo a traves de FTP de una red externa.

SRX300> ftp 192.168.199.9 source 10.10.100.1
Connected to 192.168.199.9.
220-FileZilla Server 0.9.60 beta
220-written by Tim Kosse (tim.kosse@filezilla-project.org)
220 Please visit https://filezilla-project.org/
Name (192.168.199.9): guliano
331 Password required for guliano
Password:
230 Logged on
Remote system type is UNIX.

ftp> lcd /var/tmp/
Local directory now /cf/var/tmp
ftp> bin
200 Type set to I

ftp> get junos-srxsme-18.1R1.9.tgz
local: junos-srxsme-18.1R1.9.tgz remote: junos-srxsme-18.1R1.9.tgz
200 Port command successful
150 Opening data channel for file download from server of "/junos-srxsme-18.1R1.9.tgz"
100% |***********************************************************************************************************|   307 MB    00:00 ETA
226 Successfully transferred "/junos-srxsme-18.1R1.9.tgz"
322693516 bytes received in 149.89 seconds (2.05 MB/s)

ftp>
ftp> bye
SRX300>

Validacion de nuevo Sistema Operativo

SRX300> request system software add no-copy /var/tmp/junos-srxsme-18.1R1.9.tgz
NOTICE: Validating configuration against junos-srxsme-18.1R1.9.tgz.
NOTICE: Use the 'no-validate' option to skip this if desired.
Formatting alternate root (/dev/da0s1a)...
/dev/da0s1a: 2510.1MB (5140780 sectors) block size 16384, fragment size 2048
        using 14 cylinder groups of 183.62MB, 11752 blks, 23552 inodes.
super-block backups (for fsck -b #) at:
 32, 376096, 752160, 1128224, 1504288, 1880352, 2256416, 2632480, 3008544,
 3384608, 3760672, 4136736, 4512800, 4888864
Checking compatibility with configuration
Initializing...
cp: /var/etc/extensions.allow: No such file or directory
cp: /var/db/certs/common/local/*: No such file or directory
cp: /var/db/certs/common/key-pair/*: No such file or directory
Using junos-18.1R1.9 from /altroot/cf/packages/install-tmp/junos-18.1R1.9
Copying package ...
mkdir: /cf/var/validate/c/tmp: No such file or directory
mount_nullfs: /cf/var/validate/c/tmp: No such file or directory
cd: can't cd to /cf/var/validate/c/tmp/junos
/usr/libexec/ui/validate-config: cannot create /cf/var/validate/c/tmp/junos/+INSTALL.x: No such file or directory
chroot: /bin/sh: No such file or directory
ERROR: validate-config: /cf/var/validate/c/tmp/junos/+INSTALL fails
ERROR: Configuration validation failed with /altroot/cf/packages/install-tmp/junos-18.1R1.9

Si el reporte de la configuracion no opera con el nuevo sistema operativo, se puede  realizar el bypass con la opcion "no-validate option".

SRX300> request system software add no-copy no-validate /var/tmp/junos-srxsme-18.1R1.9.tgz
Formatting alternate root (/dev/da0s1a)...
/dev/da0s1a: 2510.1MB (5140780 sectors) block size 16384, fragment size 2048
        using 14 cylinder groups of 183.62MB, 11752 blks, 23552 inodes.
super-block backups (for fsck -b #) at:
 32, 376096, 752160, 1128224, 1504288, 1880352, 2256416, 2632480, 3008544,
 3384608, 3760672, 4136736, 4512800, 4888864
Installing package '/altroot/cf/packages/install-tmp/junos-18.1R1.9' ...
Verified junos-boot-srxsme-18.1R1.9.tgz signed by PackageProductionEc_2018 method ECDSA256+SHA256
Verified junos-srxsme-18.1R1.9-domestic signed by PackageProductionEc_2018 method ECDSA256+SHA256
JUNOS 18.1R1.9 will become active at next reboot
WARNING: A reboot is required to load this software correctly
WARNING:     Use the 'request system reboot' command
WARNING:         when software installation is complete
Saving state for rollback ...

Validacion de Sistema Operativo instalado.

SRX300> start shell
% ls -al /var/tmp/

-rw-r--r--   1 2000  wheel  295871546 Oct  4  2017 junos-srxsme-17.3R1.10.tgz
-rw-r--r--   1 nec   wheel  322693516 Sep  1 20:23 junos-srxsme-18.1R1.9.tgz

Reiniciar el Equipo Router

SRX300> request system reboot
Reboot the system ? [yes,no] (no) yes
Shutdown NOW!
[pid 75925]

SRX300>
*** FINAL System shutdown message from SRX300 ***
System going down IMMEDIATELY

Validacion final

login: 
Password:
--- JUNOS 18.1R1.9 built 2018-03-23 20:34:24 UTC

SRX300>
SRX300>show version
Hostname: SRX300
Model: srx300
Junos: 18.1R1.9
JUNOS Software Release [18.1R1.9]


martes, 31 de agosto de 2021

Configuracion por Defecto Router Huawei

A continuacion se detalla como volver a la configuracion por defecto de los Router Huawei.

 <Huawei>reset saved-configuration
 Warning: This will delete the configuration in the flash memory.
 The device configurations will be erased to reconfigure.

 Are you sure? (y/n)[n]:y
Info: Clear the configuration in the device successfully.

<Huawei>
<Huawei>reboot
Info: The system is comparing the configuration, please wait.
Warning: All the configuration will be saved to the next startup configuration. Continue? [y/n]:n

System will reboot! Continue? [y/n]:y
Info: system is rebooting, please wait...

<Huawei>
May 10 2000 15:23:16+00:00 Huawei %%01DEV/4/ENTRESET(l)[1]:Board[0] is reset, The reason is: Reset by user command.
Requesting system reboot
[  697.820665] Restarting system.

******

 Press any key to get started

Login authentication

Username:admin
Password: Admin@huawei
<Huawei>


Configuracion de IP estatica en APs Huawei (AP5030DN)

Se utiliza la configuracion de IP estatica en los APs de Huawei cuando no existe un servidor DHCP para la asignacion de direccionamiento IP a los APs.

<10c1-1234-c600>system-view 
Enter system view, return user view with Ctrl+Z.

[10c1-1234-c600]ap-address mode static 
Info: The configuration takes effect after the AP is restarted.

[10c1-1234-c600]ap-address static ip-address 192.168.199.1 255.255.255.0
Info: The configuration takes effect after the AP is restarted.

[10c1-1234-c600]ap-address static ac-list 192.168.199.200 
/* Direccion IP correspondiente a AC /*
Info: The configuration takes effect after the AP is restarted.

[10c1-1234-c600]quit 

<10c1-1234-c600>reboot 

System will reboot! Continue ? [y/n]:y

Info: system is rebooting ,please wait...
<10c1-1234-c600>

<10c1-1234-c600>display ap-address-info
==============================================================
Active AP Address Info

  AP Mode     : static
  Ip Address  : 192.168.199.1
  Ip Version  : 4
  Mask        : 255.255.255.0
  Gateway     : -
  AC 0 ip     : 192.168.199.200
  AC 1 ip     : -
  AC 2 ip     : -
  AC 3 ip     : -

--------------------------------------------------------------

Reboot Active AP Address Info

  AP Mode     : static
  Ip Address  : 192.168.199.1
  Ip Version  : 4
  Mask        : 255.255.255.0
  Gateway     : -
  AC 0 ip     : 192.168.199.200
  AC 1 ip     : -
  AC 2 ip     : -
  AC 3 ip     : -


miércoles, 28 de abril de 2021

Borra archivos HPROF en Cisco CMX

Los datos perdidos en equipo Cisco CMX no son posible recuperarlos.Sin embargo, existen problemas de carga en cache de JAVA que es necesario limpiar a traves de los archivos HPROF, los cuales pueden estar causando esta perdidas de datos.

Detalle tecnico de la revision:

CMX HPROF Files
=======================================================================================

/opt/cmx/var/log/nmsplb/java_pid29221.hprof
/opt/cmx/var/log/nmsplb/java_pid6280.hprof
/opt/cmx/var/log/nmsplb/java_pid6881.hprof
/opt/cmx/var/log/nmsplb/java_pid19612.hprof
/opt/cmx/var/log/presence/java_pid32466.hprof

Comandos utilizados:

[cmxadmin@CMX ~]$ su -
Password: 123456
[root@CMX ~]#
[root@CMX ~]# cd /opt/cmx/var/log/nmsplb/
[root@CMX nmsplb]# ll
total 24879068
-rw-r--r--. 1 cmx cmx          0 Oct 28  2019 batch.log
-rw-r--r--. 1 cmx cmx   52436971 Apr  9 19:20 error-1.log
-rw-r--r--. 1 cmx cmx          0 Oct 28  2019 heterarchy.log
-rw-------. 1 cmx cmx 4947842167 Dec 29 16:35 java_pid19612.hprof
-rw-------. 1 cmx cmx 4413003406 Mar 31 21:30 java_pid2779.hprof
-rw-------. 1 cmx cmx 5144773801 Dec 19 10:03 java_pid29221.hprof
-rw-------. 1 cmx cmx 4954666834 Jan  4 16:02 java_pid6280.hprof
-rw-------. 1 cmx cmx 4935861279 Dec 30 19:18 java_pid6881.hprof
-rw-r--r--. 1 cmx cmx    1785585 Apr 24 23:44 jdbc.log
-rw-r--r--. 1 cmx cmx          0 Oct 28  2019 sanity.log
-rw-r--r--. 1 cmx cmx   52428866 Sep  3  2020 server-10.log
-rw-r--r--. 1 cmx cmx   52428892 Mar 18 22:35 server-1.log

[root@CMX nmsplb]#
[root@CMX nmsplb]#
[root@CMX nmsplb]#
[root@CMX nmsplb]# rm -rf java_pid19612.hprof
[root@CMX nmsplb]# rm -rf java_pid2779.hprof
[root@CMX nmsplb]# rm -rf java_pid29221.hprof
[root@CMX nmsplb]# rm -rf java_pid6280.hprof
[root@CMX nmsplb]# rm -rf java_pid6881.hprof
[root@CMX nmsplb]#
[root@CMX nmsplb]#
[root@CMX nmsplb]# ll
total 1054692
-rw-r--r--. 1 cmx cmx          0 Oct 28  2019 batch.log
-rw-r--r--. 1 cmx cmx   52436971 Apr  9 19:20 error-1.log
-rw-r--r--. 1 cmx cmx          0 Oct 28  2019 heterarchy.log
-rw-r--r--. 1 cmx cmx    1785585 Apr 24 23:44 jdbc.log
-rw-r--r--. 1 cmx cmx          0 Oct 28  2019 sanity.log
-rw-r--r--. 1 cmx cmx   52428866 Sep  3  2020 server-10.log
-rw-r--r--. 1 cmx cmx   52428892 Mar 18 22:35 server-1.log
[root@CMX nmsplb]#


Cargar IOS Cisco a traves de FTP utilizando VRF

Cuando copiamos la IOS de un router utilizando VRF, debemos utilizar la interface fuente correspondiente a la VRF a utilizar, ademas el nombre y la password debe ser especificada.

Ejemplo en un equipo Cisco9500


C9500#show run interf vlan 9

!
interface Vlan9
 description Red Internet
 ip vrf forwarding Internet
 ip address 2.2.2.2 255.255.255.240
end


C9500#configure terminal
C9500(config)#ip ftp source-interface Vlan9
C9500(config)#ip ftp username Gfuentes
C9500(config)#ip ftp password C1sC0$

C9500#
C9500#copy ftp: flash:
Address or name of remote host []? 1.1.1.1    /* IP ADD del servidor FTP /*
Source filename []? cat9k_iosxe.17.03.03.SPA.bin
Destination filename [cat9k_iosxe.17.03.03.SPA.bin]?
Accessing ftp://200.68.6.62/cat9k_iosxe.17.03.03.SPA.bin...
Loading cat9k_iosxe.17.03.03.SPA.bin !!!!!!!!!!!!!!!!!!!!!!!!!!!!!!!!!!!!!!!!!!!!!!!!!!!!!!!!!!!!!!!!!!!!!!!!!!!!!!!!!!!!!!!!!!!!!!!!!!!!!!!!!!!!!!!!!!!!!!!!!!!!!!!!!!!!!!!!!!!!!!!!!!!!!!!!!!!!!!!!!!!!!!!!!!!!!!!!!!!!!!!!!!!!!!!!!!!!!!!!!!!!!!!!!!!!!!!!!!!!!!!!!!!!!!!!!!!!!!!!!!!!!!!!!!!!!!!!!!!!!!!!!!!!!!!!!!!!!!!!!!!!!!!!!!!!!!!!!!!!!!!!!!!!!!!!!!!!!!!!!!!!!!!!!!!!!!!!!!!!!!!!!!!!!!!!!!!!!!!!!!!!!!!!!!!!!!!!!!!!!!!!!!!!!!!!!!!!!!!!!!!!!!!!!!!!!!!!!!!!!!!!!!!!!!!!!!!
[OK - 901741775/4096 bytes]

901741775 bytes copied in 654.829 secs (1377065 bytes/sec)
C9500#

Validar la correcta instalacion de la nueva IOS

C9500#verify flash:cat9k_iosxe.17.03.03.SPA.bin
Verifying file integrity of flash:cat9k_iosxe.17.03.03.SPA.bin...........................................................................................................................................................................................................................................................................................................................................................................
Embedded Hash   SHA1 : 86144E8D88FE3DC09924989F6D54614CD760F70A
Computed Hash   SHA1 : 86144E8D88FE3DC09924989F6D54614CD760F70A
Starting image verification
Hash Computation:    100%Done!
Computed Hash   SHA2: d86bccd824544cac29ae634be6e4d394
                      a05a0d9cdd7d9d0b569cfa4083a5394d
                      3ceca89a6562b2f4c91814066314b0f3
                      d96f36e07c44ab35433e7a8286f61d69

Embedded Hash   SHA2: d86bccd824544cac29ae634be6e4d394
                      a05a0d9cdd7d9d0b569cfa4083a5394d
                      3ceca89a6562b2f4c91814066314b0f3
                      d96f36e07c44ab35433e7a8286f61d69

Digital signature successfully verified in file flash:cat9k_iosxe.17.03.03.SPA.bin
 

lunes, 26 de abril de 2021

Huawei - Local VLAN Mirroring - Switch CE6851

 1.- Configuracion de puerta donde se conectara el Sniffer.

<SW6851> system-view
[SW6851] observe-port 1 interface 10ge 1/0/2
[SW6851] commit


2.- Configuracion de VLAN a configurar

<SW6851>system-view
[SW6851]vlan 100
[SW6851-vlan100]mirroring observe-port 1 inbound
[SW6851-vlan100]commit


<SW6851> display port-mirroring
  VLAN mirroring:
  -----------------------------------------------------------------------------
  VLAN                  Direction        ObservePort : Interface
  -----------------------------------------------------------------------------
  VLAN 100             Inbound                    1 : 10GE1/0/2          
  -----------------------------------------------------------------------------


NOTA: Este modelo no soporta las opciones <<outbound>> ni <<both>>


lunes, 19 de abril de 2021

Configuracion de Switches 3750-X en modo Stack

Al iniciar la configuracion de Switches 3750-X en modo Stack, no conecte ningun cable stacking todavia, decida cual switch sera el "Master" a traves de los siguientes comandos:

Switch#configure terminal
Enter configuration commands, one per line.  End with CNTL/Z.
Switch(config)#switch 1 priority 15
Changing the Switch Priority of Switch Number 1 to 15
Do you want to continue?[confirm] {Enter}
New Priority has been set successfully

Switch(config)#do write mem
Building configuration...
[OK]

Switch(config)#do reload
Proceed with reload? [confirm] {Enter}

Cuando se este iniciando el switch y vea el siguiente mensaje:

Waiting for Stack Master Election...
SM: Waiting for other switches in stack to boot...
###############################################################

En este punto puede conectar el cable stack y encender el siguiente switch. Cada puerta "stack port one" debe conectarse a la puerta "stack port two".

Despues que los dos switches se encuentren encedidos se debe verificar lo siguiente:

Switch#show switch
Switch/Stack Mac Address : 74a2.e69a.0c00
                                           H/W   Current
Switch#  Role   Mac Address     Priority Version  State
----------------------------------------------------------
*1       Master 74a2.e69a.0c00     15     3       Ready
 2       Member 204c.9e5f.4000     1      3       Ready

Switch#show ip int brief
Interface              IP-Address      OK? Method Status                Protocol
Vlan1                  unassigned      YES NVRAM  administratively down down
FastEthernet0          unassigned      YES NVRAM  administratively down down
GigabitEthernet1/0/1   unassigned      YES unset  down                  down
GigabitEthernet1/0/2   unassigned      YES unset  down                  down
GigabitEthernet1/0/3   unassigned      YES unset  down                  down
GigabitEthernet1/0/4   unassigned      YES unset  down                  down
{----------------Output Removed For the Sake of Brevity---------------------}
GigabitEthernet1/1/1   unassigned      YES unset  down                  down
GigabitEthernet1/1/2   unassigned      YES unset  down                  down
GigabitEthernet1/1/3   unassigned      YES unset  down                  down
GigabitEthernet1/1/4   unassigned      YES unset  down                  down
Te1/1/1                unassigned      YES unset  down                  down
Te1/1/2                unassigned      YES unset  down                  down
GigabitEthernet2/0/1   unassigned      YES unset  down                  down
GigabitEthernet2/0/2   unassigned      YES unset  down                  down
GigabitEthernet2/0/3   unassigned      YES unset  down                  down
{----------------Output Removed For the Sake of Brevity---------------------}
GigabitEthernet2/1/1   unassigned      YES unset  down                  down
GigabitEthernet2/1/2   unassigned      YES unset  down                  down
GigabitEthernet2/1/3   unassigned      YES unset  down                  down
GigabitEthernet2/1/4   unassigned      YES unset  down                  down
Te2/1/1                unassigned      YES unset  down                  down
Te2/1/2                unassigned      YES unset  down                  down

Asegurese que el cableado stack se encuentra funcionando normalmente.

Switch# show switch stack-ports summary
Switch#/  Stack   Neighbor   Cable    Link   Link   Sync      #         In
 Port#     Port              Length    OK   Active   OK    Changes   Loopback
          Status                                          To LinkOK
--------  ------  --------  --------  ----  ------  ----  ---------  --------
  1/1     OK         2      50 cm     Yes    Yes    Yes        1        No
  1/2     OK         2      50 cm     Yes    Yes    Yes        1        No
  2/1     OK         1      50 cm     Yes    Yes    Yes        1        No
  2/2     OK         1      50 cm     Yes    Yes    Yes        1        No

Switch# show switch stack-ring speed
Stack Ring Speed        : 32G
Stack Ring Configuration: Full
Stack Ring Protocol     : StackWisePlus
Switch#

Validar la conectividad de las fuentes de poder de los switches.

Switch>show env power all
SW  PID                 Serial#     Status           Sys Pwr  PoE Pwr  Watts
---  ------------------  ----------  ---------------  -------  -------  -----
1A  C3KX-PWR-350WAC     LIT18410MD4 OK              Good     Good     350/0
1B  Not Present
2A  C3KX-PWR-350WAC     LIT18410JJ3 OK              Good     Good     350/0
2B  Not Present
En el caso de utilizar cables de poder redundantes XPS;

Switch#show stack-power neighbors
Power Stack           Stack   Stack    Total   Rsvd    Alloc   Unused  Num  Num
Name                  Mode    Topolgy  Pwr(W)  Pwr(W)  Pwr(W)  Pwr(W)  SW   PS
--------------------  ------  -------  ------  ------  ------  ------  ---  ---
Powerstack-2          SP-PSS  Ring     700     320     380     0       2    2
    Power Stack           Port 1  Port 1             Port 2  Port 2
SW  Name                  Status  Neighbor SW:MAC    Status  Neighbor SW:MAC
--  --------------------  ------  ----------------   ------  ----------------
1   Powerstack-2          Conn    2:204c.9e5f.4000   Conn    2:204c.9e5f.4000
2   Powerstack-2          Conn    1:74a2.e69a.0c00   Conn    1:74a2.e69a.0c00

miércoles, 21 de octubre de 2020

Juniper SRX – Commit error: Missing mandatory statement

Despues de cambiar la configuracion inicial en un dispositivo Juniper SRX, es posible que al momento de guardar la configuracion aparezca el siguiente error.

root# commit
[edit]
  'system'
    Missing mandatory statement: 'root-authentication'
error: commit failed: (missing mandatory statements)

Este error se debe a que no se ha configurado el "root password". Este debe ser configurado antes de guardar los cambios en el equipo a traves del siguiente comando.

root# set system root-authentication plain-text-password
New password: juniper1
Retype new password:juniper1
root# commit

viernes, 1 de marzo de 2019

Configuración Nuevo Cisco ISE 2.4 - Deshabilitación de Expiración de Password


Cuando se instala un nuevo Cisco ISE se recomienda deshabilitar la expiración de password que viene habilitada por defecto en 45 días. Si no se realiza y no se cambia la password durante el tiempo indicado se perderá el acceso al ISE y será necesaria resetear la password.

En Cisco ISE Ir a: Administration -> System -> Admin Access -> Password Policy -> Password Lifetime y desmarcar la opción  Administrator passwords expire.


jueves, 20 de diciembre de 2018

Borrar configuración de AP en modo LWAAP

Este procedimiento, es necesario realizarlo al momento de existir problemas de asociación entre el AP y el WLC.

Se puede borrar la configuración correspondiente a los AP en modo LWAAP a través del comando "clear", pero no esta disponible por defecto.

AP5c83.8f3b.fdac>ena
Password:
AP5c83.8f3b.fdac# clear capwap private-config
                     ^
% Invalid input detected at '^' marker.

Para permitir este comando es necesario habilitar el modo debug, a través del siguiente comando.

AP5c83.8f3b.fdac#debug capwap console cli
This command is meant only for debugging/troubleshooting
Any configuration change may result in different
behavior from centralized configuration.

Paso 1.- Borrar la configuración previamente almacenada en el AP.

CAPWAP console CLI allow/disallow debugging is on
AP5c83.8f3b.fdac# clear capwap private-config


Paso 2.- Reiniciar el AP

AP5c83.8f3b.fdac#reload
System configuration has been modified. Save? [yes/no]: yes
Proceed with reload? [confirm]

Despues del reinicio, este AP podira unirse sin problemas al Controlador.

martes, 18 de diciembre de 2018

Upgrade Manual de lightweight Access Point

Se puede realizar la actualización de firmware de Access Point (AP) en forma manual. Para esto es necesario descargar el firmware desde Cisco.com.

Una vez descargado el archivo, este debe ser almacenado en un servidor TFTP que debe ser alcanzado desde el AP.

Para descargar, extraer e instalar el nuevo firmware es necesario utilizar el comando "archive", pero este no esta disponible por defecto.

AP5c83.8f3b.fdac#arch?
% Unrecognized command

Para permitir este comando es necesario habilitar el modo debug.

AP5c83.8f3b.fdac#debug capwap console cli
This command is meant only for debugging/troubleshooting
Any configuration change may result in different
behavior from centralized configuration.

CAPWAP console CLI allow/disallow debugging is on

En estos momentos es posible seguri con el procedimiendo de actualizacion de firmware, debido que es posible contar con el comando "archive"

Paso 1.-  Revision de IOS instalada en AP

AP5c83.8f3b.fdac#show flash: 

Directory of flash:/

    2  -rwx        1048  Mar 04 2002 17:42:43 +00:00  private-multiple-fs
    4  -rwx         209  Mar 01 2002 00:00:08 +00:00  env_vars
    5  -rwx        3318  Mar 04 2002 17:42:43 +00:00  config.txt
    6  drwx         512  Jan 31 2009 04:53:24 +00:00  c1200-k9w7-mx.123-8.JEB
  158  -rwx           5  Mar 04 2002 17:42:43 +00:00  private-config

7741440 bytes total (2740736 bytes free)


Paso 2.-  Respaldar IOS Actual

AP5c83.8f3b.fdac#cd c1200-k9w7-mx.123-8.JEB

AP5c83.8f3b.fdac#pwd
flash:/c1200-k9w7-mx.123-8.JEB/

AP5c83.8f3b.fdac#copy flash: tftp:         
Source filename [/c1200-k9w7-mx.123-8.JEB/c1200-k9w7-mx.123-8.JEB]? 
Address or name of remote host []? 10.3.64.5                 
Destination filename [c1200-k9w7-mx.123-8.JEB]? 
!!!!!!!!!!!!!!!!!!!!!!!!!!!!!!!!!!!!!!!!!!!!!!!!!!!!!!!!!!!!!!!!!!!!!!!!!!!!!!!!!!!!!!!!!!!!!!!!!!!!!!!!!!!!!!!!!!!!!!!!!!!!!
!!!!!!!!!!!!!!!!!!!!!!!!!!!!!!!!!!!!!!!!!!!!!!!!!!!!!!!!!!!!!!!!!!!!!!!!!!!!!!!!!!!!!!!!!!!!!!!!!!!!!!!!!!!!!!!!!!!!!!!!!!!!!
!!!!!!!!!!!!!!!!!!!!!!!!!!!!!!!!!!!!!!!!!!!!!!!!!!!!!!!!!!!!!!!!!!!!!!!!!!!!!!!!!!!!!!!!!!!!!!!!!!!!!!!!!!!!!!!!!!!!!!!!!!!!!
!!!!!!!!!!!!!!!!!!!!!!!!!!!!!!!!!!!!!!!!!!!!!!!!!!!!!!!!!!!!!!!!!!!!!!!!!!!!!!!!!!!!!!!!!!!!!!!!!!!!!!!!!!!!!!!!!!!!!!!!!!!!!
!!!!!!!!!!!!!!!!!!!!!!!!!!!!!!!!!!!!!!!!!!!!!!!!!!!!!!!!!!!!!!!!!!!!!!!!!!!!!!!!!!!!!!!!!!!!!!!!!!!!!!!!!!!!!!!!!!!!!!!!!!!!!
!!!!!!!!!!!!!!!!!!!!!!!!!!!!!!!!!!!!!!!!!!!!!!!!!!!!!!!!!!!!!!!!!!!!!!!!!!!!!!!!!!!!!!!!!!!!!
3668650 bytes copied in 9.726 secs (377200 bytes/sec)


Paso 3.- Borrar IOS Actual

AP5c83.8f3b.fdac#delete /force /recursive flash:/c1200-k9w7-mx.123-8.JEB
Delete filename [c1200-k9w7-mx.123-8.JEB]? 

AP5c83.8f3b.fdac#dir
Directory of flash:/

    2  -rwx        1048  Mar 04 2002 17:42:43 +00:00  private-multiple-fs
    4  -rwx         209  Mar 01 2002 00:00:08 +00:00  env_vars
    5  -rwx        3318  Mar 04 2002 17:42:43 +00:00  config.txt
  158  -rwx           5  Mar 04 2002 17:42:43 +00:00  private-config

7741440 bytes total (7734272 bytes free)


Paso 4.- Upgrade IOS 

AP5c83.8f3b.fdac#archive download-sw tftp://10.3.64.5/c1200-k9w7-tar.123-8.JEE.tar
examining image...Loading c1200-k9w7-tar.123-8.JEE.tar from 172.16.4.61 (via BVI1): !
extracting info (274 bytes)
!!!!!!!!!!!!!!!!!!!!!!!!!!!!!!!!!!!!!!!!!!!!!!!!!!!!!!!!!!!!!!!!!!!!!!!!!!!!!!!!!!!!!!!!!!!!!!!!!!!!!!!!!!!!!!!!!!!!!!!
!!!!!!!!!!!!!!!!!!!!!!!!!!!!!!!!!!!!!!!!!!!!!!!!!!!!!!!!!!!!!!!!!!!

this completes ok.

[OK - 4522496 bytes]


jueves, 8 de noviembre de 2018

Procedimiento de carga de licencia a Router Cisco


Paso 1: Copiar la licencia a través de FTP o TFTP a la memoria FLASH del router.

Router#copy ftp: flash:
Address or name of remote host []? 172.30.79.198
Source filename []? FTX181324AB_20199918063213280.lic
Destination filename [FTX181324AB_20199918063213280.lic]?
Accessing ftp://172.30.79.198/FTX181324AB_20199918063213280.lic...
Loading FTX181324AB_20199918063213280.lic !
[OK - 1155/4096 bytes]

1155 bytes copied in 5.948 secs (194 bytes/sec)


Paso 2: Verificar que se encuentre instalada la licencia en el dispositivo.

Router#show flash
-#- --length-- -----date/time------ path
1     68951124 Apr 19 2014 00:40:58 +00:00 c1900-universalk9-mz.SPA.152-4.M6.bin
2         3064 Apr 19 2014 00:50:12 +00:00 cpconfig-19xx.cfg
3          660 Dec 12 2015 13:19:20 +00:00 vlan.dat
247       1155 Dec 21 2015 18:08:36 +00:00 FTX181324AB_20199918063213280.lic

Paso 3: Instalar la licencia al equipo router, en este punto la licencia se encuentra instalada pero no habilitada.

Router#license install flash:FTX181324AB_20199918063213280.lic

Installing licenses from "flash:FTX181324AB_20199918063213280.lic"
Installing...Feature:securityk9...Successful:Supported
1/1 licenses were successfully installed
0/1 licenses were existing licenses
0/1 licenses were failed to install

Paso 4: Reiniciar el equipo y verificar que se encuentre habilitada la licencia.

Router#show license
Index 1 Feature: ipbasek9
        Period left: Life time
        License Type: Permanent
        License State: Active, In Use
        License Count: Non-Counted
        License Priority: Medium
Index 2 Feature: securityk9
        Period left: Life time
        License Type: Permanent
        License State: Active, In Use
        License Count: Non-Counted
        License Priority: Medium


Nota: Anteriormente se encontraba en el siguiente estado;


Router#show license
Index 1 Feature: ipbasek9
        Period left: Life time
        License Type: Permanent
        License State: Active, In Use
        License Count: Non-Counted
        License Priority: Medium
Index 2 Feature: securityk9
        Period left: 7  weeks 2  days
        Period Used: 1  week  1  day
        License Type: EvalRightToUse
        License State: Active, In Use
        License Count: Non-Counted
        License Priority: Low

miércoles, 7 de noviembre de 2018

Configuración de ALIAS


El siguiente comando nos permite configurar un ALIAS para ayudarnos a ingresar comandos en forma resumida y con un nombre en particular dado por nosotros.


Router(config)# alias exec sip show ip route
Router# sip

Codes: L - local, C - connected, S - static, R - RIP, M - mobile, B - BGP
       D - EIGRP, EX - EIGRP external, O - OSPF, IA - OSPF inter area
       N1 - OSPF NSSA external type 1, N2 - OSPF NSSA external type 2
       E1 - OSPF external type 1, E2 - OSPF external type 2

Gateway of last resort is 10.184.124.4 to network 0.0.0.0

S*    0.0.0.0/0 [1/0] via 10.184.124.4
      10.0.0.0/8 is variably subnetted, 172 subnets, 7 masks
S        10.0.1.55/32 [1/0] via 10.184.0.41

  
Si utilizamos el comando alias configure, el comando deberá ser ejecutado en el modo de configuración.

Router(config)#alias configure sip1 do show ip route
Router(config)# sip1


Codes: L - local, C - connected, S - static, R - RIP, M - mobile, B - BGP
       D - EIGRP, EX - EIGRP external, O - OSPF, IA - OSPF inter area
       N1 - OSPF NSSA external type 1, N2 - OSPF NSSA external type 2
       E1 - OSPF external type 1, E2 - OSPF external type 2
       i - IS-IS, su - IS-IS summary, L1 - IS-IS level-1, L2 - IS-IS level-2
       ia - IS-IS inter area, * - candidate default, U - per-user static route
       o - ODR, P - periodic downloaded static route, + - replicated route

Gateway of last resort is 10.184.124.4 to network 0.0.0.0

S*    0.0.0.0/0 [1/0] via 10.184.124.4
      10.0.0.0/8 is variably subnetted, 172 subnets, 7 masks
S        10.0.1.55/32 [1/0] via 10.184.0.41

jueves, 25 de octubre de 2018

Método para forzar la utilización de SFP Transceiver no propietarios en dispositivos Cisco.

De acuerdo a pruebas realizadas en equipo Router Cisco C899G-LTE-LA-K9 con módulos de fibra (SFP) no propietarios, se efectuaron pruebas con el siguiente módulo SFP Raisecom USFP-Gb/SS134-D-R 1.26G. 

En una primera instancia sin ningún tipo  de configuración en el equipo este módulo no es reconocido directamente;

*Apr 26 12:19:58.007: %GBIC_SECURITY_CRYPT-4-VN_DATA_CRC_ERROR: GBIC in port 1 has bad crc
*Apr 26 12:19:58.007: %MAINBOARD_SFP-6-INSERTED: Transceiver module unapproved SFP is inserted in GigabitEthernet8 port.
*Apr 26 12:19:58.007: %MAINBOARD_SFP-4-NON_CISCO_SFP: Unsupported SFP transceiver module found on board.

Por lo tanto, para que pueda ser aceptado se requiere habilitar el siguiente comando el equipo Cisco.

Router(config)#service unsupported-transceiver 
 Warning: When Cisco determines that a fault or defect can be traced to
the use of third-party transceivers installed by a customer or reseller,
then, at Cisco's discretion, Cisco may withhold support under warranty or
a Cisco support program. In the course of providing support for a Cisco
networking product Cisco may require that the end user install Cisco
transceivers if Cisco determines that removing third-party parts will
assist Cisco in diagnosing the cause of a support issue.

*Apr 26 12:23:16.007: %GBIC_SECURITY_CRYPT-4-VN_DATA_CRC_ERROR: GBIC in port 1 has bad crc
*Apr 26 12:23:16.007: %MAINBOARD_SFP-6-INSERTED: Transceiver module unknown SFP is inserted in GigabitEthernet8 port.


jueves, 18 de octubre de 2018

Guía de Ejercicios de Cálculo de Subredes IPv4

A continuación se entregan una serie de ejercicios que permitirán aprender y a entender el proceso de cálculo de direccionamiento IPv4.

1.- Conversión de Binario a Decimal

10010010 __________
01110111 __________
11111111 __________
11000101 __________
11110110 __________
00010011 __________
10000001 __________
00110001 __________
01111000 __________
11110000 __________


2.- Conversión de Decimal a Binario

_________________________________________ 238
_________________________________________ 34
_________________________________________ 123
_________________________________________ 50
_________________________________________ 255
_________________________________________ 200
_________________________________________ 10
_________________________________________ 138
_________________________________________ 1
_________________________________________ 13


3.- Identificación de Clases de Direcciones

10.250.1.1 _____
150.10.15.0 _____
192.14.2.0 _____
148.17.9.1 _____
193.42.1.1 _____
126.8.156.0 _____
220.200.23.1 _____
230.230.45.58 _____
177.100.18.4 _____
119.18.45.0 _____


4.- Identificación de Red y Host

4.1.- Marque con un círculo la porción de red de las siguientes direcciones:

177.100.18.4
119.18.45.0
209.240.80.78
199.155.77.56
117.89.56.45
215.45.45.0
192.200.15.0
95.0.21.90
33.0.0.0
158.98.80.0

4.2.- Marque con un círculo la porción de host de las siguientes direcciones:

10.15.123.50
171.2.199.31
198.125.87.177
223.250.200.222
17.45.222.45
126.201.54.231
191.41.35.112
155.25.169.227
192.15.155.2
123.102.45.254


6.- Calculo de direcciones de subredes

6.1.- Numero de subredes necesarias 14

Numero de host necesarios 14
Dirección de Red 192.10.10.0
Clase de dirección ________________________
Mascara de subred por defecto ________________________
Mascara de subred necesaria ________________________
Numero de subredes disponibles ________________________
Numero de host disponibles ________________________
Rango de host disponibles ________________________

6.2.- Numero de subredes necesarias 1000

Numero de host necesarios 60
Dirección de Red 165.100.0.0
Clase de dirección ________________________
Mascara de subred por defecto ________________________
Mascara de subred necesaria ________________________
Numero de subredes disponibles ________________________
Numero de host disponibles ________________________
Rango de host disponibles ________________________

6.3.- Numero de subredes necesarias 6

Numero de host necesarios 30
Dirección de Red 210.100.56.0
Clase de dirección ________________________
Mascara de subred por defecto ________________________
Mascara de subred necesaria ________________________
Numero de subredes disponibles ________________________
Numero de host disponibles ________________________
Rango de host disponibles ________________________

6.4.- Numero de subredes necesarias 6

Numero de host necesarios 30
Dirección de Red 195.85.8.0
Clase de dirección ________________________
Mascara de subred por defecto ________________________
Mascara de subred necesaria ________________________
Numero de subredes disponibles ________________________
Numero de host disponibles ________________________
Rango de host disponibles ________________________

6.5.- Numero de subredes necesarias 126

Numero de host necesarios 131070
Dirección de Red 118.0.0.0
Clase de dirección ________________________
Mascara de subred por defecto ________________________
Mascara de subred necesaria ________________________
Numero de subredes disponibles ________________________
Numero de host disponibles ________________________
Rango de host disponibles ________________________

7.- Identificar si pertenecen a direcciones IPs Validas

Dirección IP: 0.230.190.192  ________________________________
Mascara de Subred: 255.0.0.0 ________________________________
Dirección IP: 192.10.10.1 ________________________________
Mascara de Subred: 255.255.255.0 ________________________________
Dirección IP: 245.150.190.10 ________________________________
Mascara de Subred: 255.255.255.0 ________________________________
Dirección IP: 135.70.191.255 ________________________________
Mascara de Subred: 255.255.254.0 ________________________________
Dirección IP: 127.100.100.10 ________________________________
Mascara de Subred: 255.0.0.0 ________________________________
Dirección IP: 93.0.128.1 ________________________________
Mascara de Subred: 255.255.224.0 ________________________________
Dirección IP: 200.10.10.128 ________________________________
Mascara de Subred: 255.255.255.224 ________________________________
Dirección IP: 165.100.255.189 ________________________________
Mascara de Subred: 255.255.255.192 ________________________________
Dirección IP: 190.35.0.10 ________________________________
Mascara de Subred: 255.255.255.192 ________________________________
Dirección IP: 218.35.50.195 ________________________________
Mascara de Subred: 255.255.0.0 ________________________________

Instalación de modulo PoE ISR-1100-POE4 en Router Cisco series 1100

  El documento detalla la habilitación del servicio PoE (Power over Ethernet) en equipo Router Cisco C1111-4PWA, permitiendo la alimentación...